Table of Contents
You wake up after a typical Pacific Northwest rainstorm, grab your morning coffee, and notice your landscape lights are out—again. You flip the breaker, only to hear it trip seconds later. Sound familiar? If you’re a homeowner in the Portland or Vancouver area, you’re not alone. The Pacific Northwest receives 36-41 inches of rain annually, with most falling between October and April, creating unique electrical challenges for outdoor lighting. Weather-related electrical degradation is a leading cause of outdoor faults, making GFCI protection critical in wet environments. In this guide, we’ll walk you through why this keeps happening, how to safely troubleshoot the issue yourself, and when it’s time to call Sarkinen Electrical for a permanent, weatherproof solution.
It’s Not Just Rain—It’s Relentless Rain
The Pacific Northwest’s climate differs significantly from other rainy regions, and that matters for your electrical systems. Unlike areas with brief thunderstorms, our region experiences days or even weeks of continuous drizzle. This persistent moisture doesn’t just sit on surfaces—it actively works its way into your lighting system through a process called capillary action. Here’s what makes our climate so challenging for outdoor lighting:
The Capillary Action Problem
Persistent moisture doesn’t just pool—it wicks up inside wire insulation through tiny gaps, traveling from compromised splices all the way back to transformers. Think of it like water climbing up a paper towel. Once moisture finds even the smallest entry point in your wiring, it can migrate throughout your entire system.
The UV-Then-Rain Cycle
Summer sun degrades rubber gaskets and wire insulation throughout the dry months. When autumn rains arrive, water exploits these weakened points. It’s a one-two punch that catches many homeowners off guard.
Galvanic Corrosion
When rainwater (which acts as an electrolyte) contacts dissimilar metals in splices—such as copper wire and the steel spring inside wire nuts—rapid corrosion occurs. This increases electrical resistance and heat until the connection fails completely. After serving Portland and Vancouver homeowners for years, we’ve learned that it’s not the heavy downpours that cause the most damage—it’s the relentlessness of the drizzle that really gets your lighting system.
Where Your Lighting System is Most Vulnerable
Understanding where failures occur helps you diagnose problems faster and communicate effectively with professionals. Let’s break down the three most common failure points:
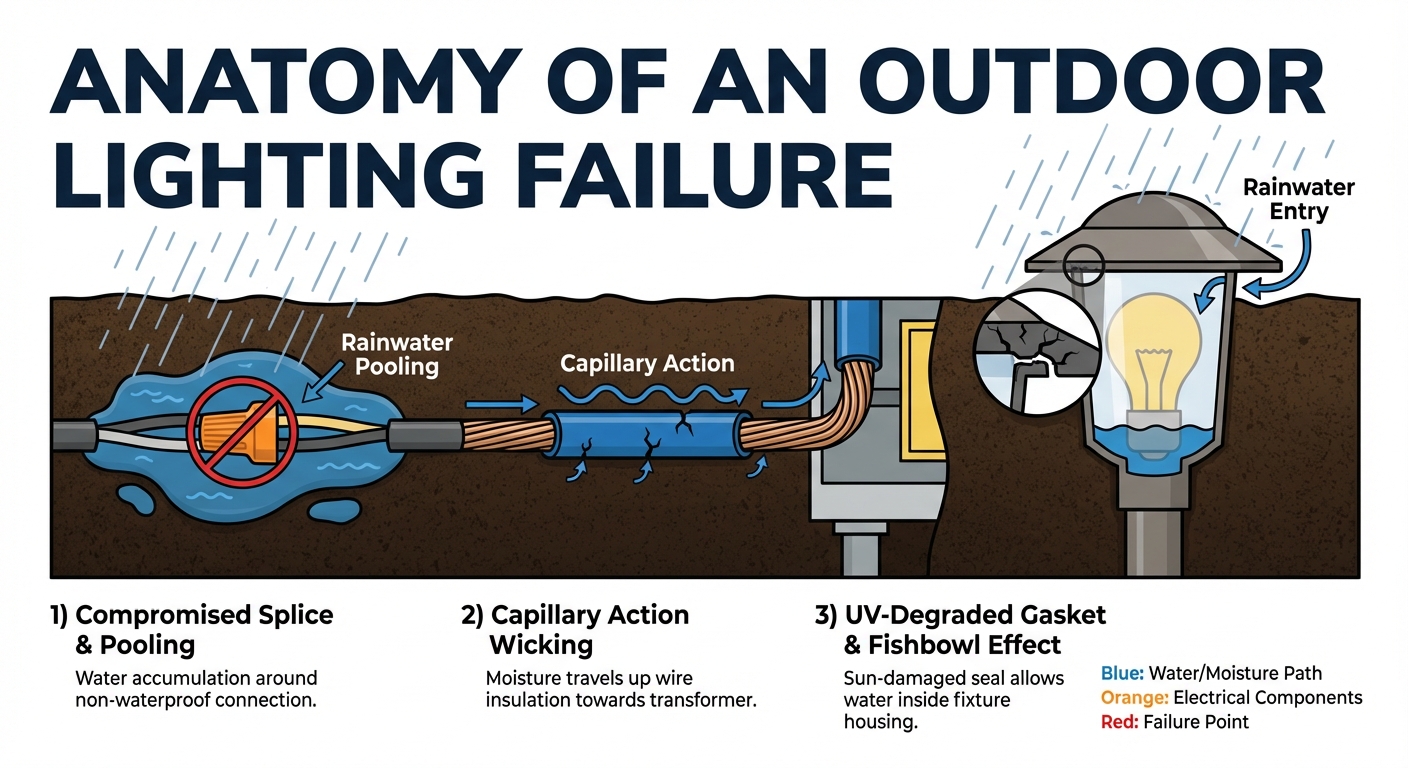
Water in the Splices (The #1 Culprit)
Standard wire nuts are designed exclusively for dry, indoor use. When buried or exposed to outdoor conditions, moisture bridges hot and neutral wires, causing an immediate short circuit. In fact, over 70% of premature low-voltage lighting failures occur at splice points, not at the fixtures themselves. What to look for:
- Exposed splices near fixtures
- Areas where landscape maintenance might have nicked wires
- Splices wrapped only in electrical tape (which degrades in 12-18 months outdoors)
- Wire connections in areas where water tends to pool
Transformer Damage from Moisture Migration
Transformers step down your home’s 120V electricity to a safer 12-15V for landscape use. When water travels up compromised wires, it can reach the transformer housing, shorting internal coils or tripping internal breakers. What to look for:
- Transformers sitting directly on wet ground
- Rust or corrosion on the housing
- Moisture inside when you open the unit (unplug first!)
- A burnt or ozone smell near the transformer
- The transformer feels excessively warm to the touch
Failed Fixture Seals (The “Fishbowl Effect”)
Outdoor fixtures are rated on an Ingress Protection (IP) scale, which measures how well they resist water and dust. UV degradation cracks rubber gaskets over time. When autumn rains arrive, water enters the housing, causing the bulb to short or the socket to corrode. What to look for:
- Condensation inside fixture lenses (looks like a foggy fishbowl)
- Visible water pooling inside upward-facing fixtures
- Rust around the bulb socket
- Gaskets that appear cracked, brittle, or misshapen
What You Can (and Can’t) Safely Check Yourself
Before diving into troubleshooting, understand your safety boundaries. You can safely work on low-voltage (12-15V) components, but if you suspect 120V line damage, stop immediately and contact Sarkinen Electrical.
Before You Start
Always ensure the transformer is unplugged before opening any housings or inspecting connections. Wear rubber-soled shoes and avoid working in wet conditions if possible.
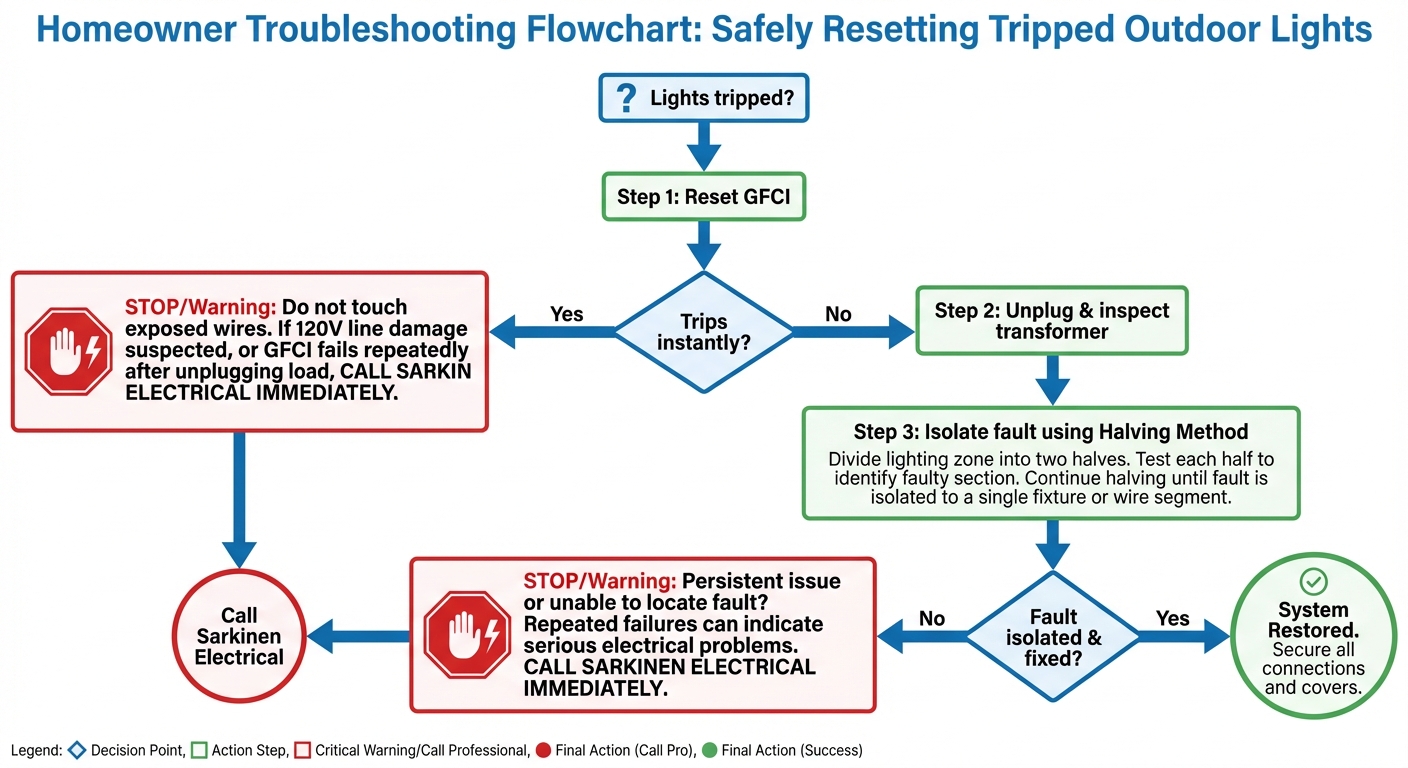
Step 1: Check the GFCI and Breaker
Locate the outdoor GFCI outlet where your transformer plugs in (usually mounted on an exterior wall near the lighting system). If the “RESET” button is popped out, press it firmly. If it trips instantly, you have an active short circuit—water is currently bridging wires somewhere in your system. Don’t keep trying to reset it; move to Step 2.
Step 2: Inspect the Transformer
Unplug the transformer completely and open the housing. Look carefully for:
- Any signs of moisture or water droplets
- Insect nests or debris
- A burnt smell or discoloration
- Visible corrosion on connections
Many transformers have a secondary internal toggle breaker. If you find one, try resetting it. If it stays reset and everything looks dry, move to Step 3.
Step 3: Isolate the Fault (The Halving Method)
This technique helps you narrow down which zone or wire run is causing the problem:
- Disconnect all field wires from the transformer output terminals
- Plug in the transformer alone
- If it stays on, your transformer is good—the fault is in your yard wiring
- Reconnect wire runs one zone at a time
- When the GFCI trips, you’ve found the problem zone
Step 4: Visual Yard Inspection
Walk your property methodically, looking for:
- Exposed wires pushed to the surface by frost heave
- Recent landscape work that might have damaged buried cables
- Standing water pooling over fixtures or wire runs
- Areas where edgers or weed trimmers might have nicked insulation
- Places where tree roots may have disturbed underground wiring
Step 5: Fixture Inspection
Examine each fixture in the affected zone:
- Check for the “fishbowl” appearance (condensation inside lenses)
- Look for water actually pooling inside the fixture
- Inspect gaskets for cracks or deterioration
- Check if the fixture sits in an area with poor drainage
⚠️ When to Call a Professional
Stop your DIY troubleshooting and contact Sarkinen Electrical if:
- You suspect the fault is in 120V line wiring
- You’ve isolated the problem but lack weatherproofing materials or expertise
- The system repeatedly fails after your DIY repairs
- You’re uncomfortable working with electrical systems
- You find widespread damage requiring multiple repairs
Why Professional Weatherproofing Pays for Itself
Professional-grade materials and installation methods eliminate the cycle of recurring failures. While DIY repairs might get your lights working temporarily, they rarely address the underlying weatherproofing issues that caused the failure in the first place.
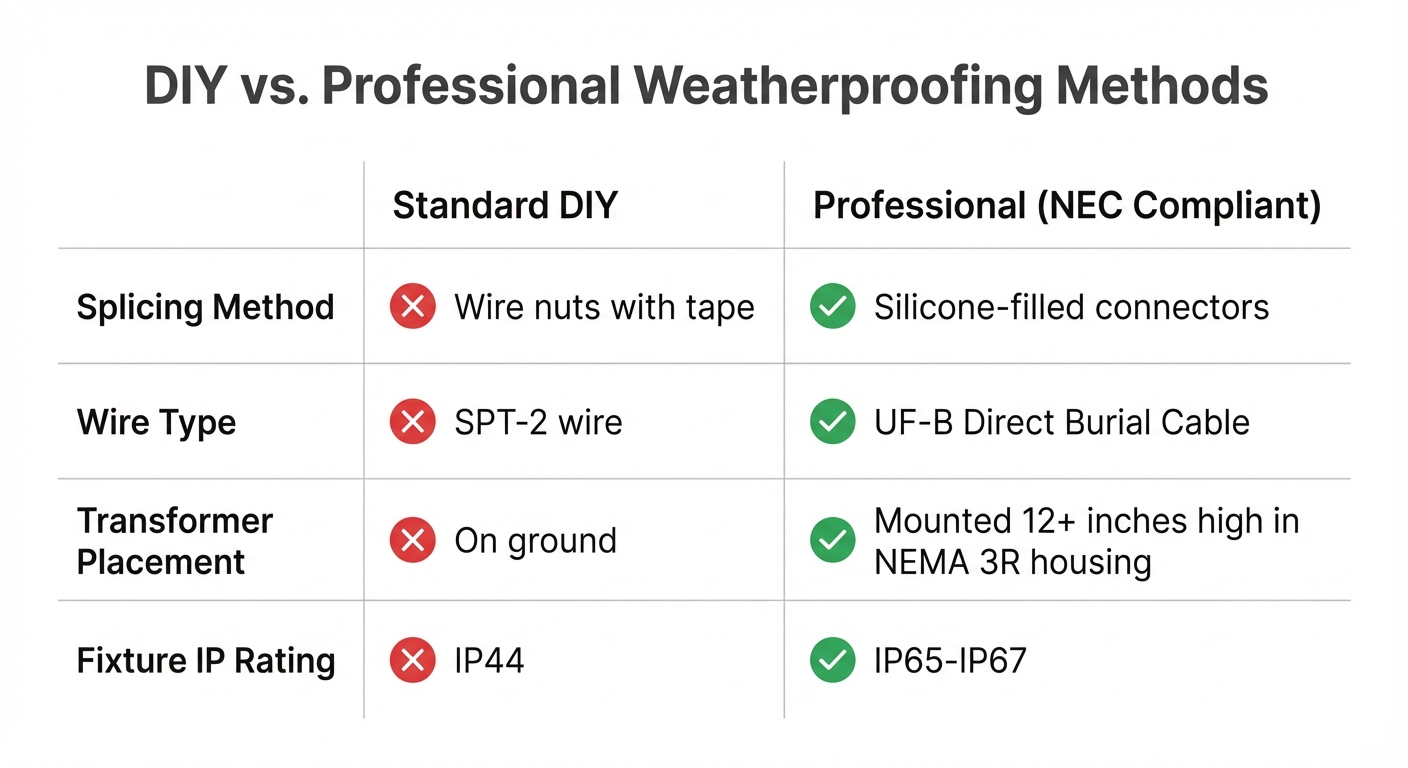
What Makes Professional Installations Different
Silicone-Filled Connections vs. Wire Nuts
Standard wire nuts wrapped in electrical tape fail within 14 months in wet environments. Professional silicone-filled connectors or heat-shrink tubing over soldered joints maintain 100% conductivity for 10+ years. The investment in proper materials eliminates the frustration of repeated failures.
Direct-Burial Cable (UF-B)
DIY kits typically include SPT-2 or basic speaker wire, both of which degrade from UV exposure and moisture. Professional electricians use UF-B (Underground Feeder) cable, specifically rated for direct burial in high-moisture environments. This cable type features thicker insulation designed to withstand our climate.
Proper Transformer Mounting
We mount transformers at least 12 inches above ground level in NEMA 3R-rated weather-resistant housings. This prevents splash damage during heavy rains and ensures proper drainage away from electrical components. Many DIY installations place transformers directly on the ground, where they’re vulnerable to standing water.
IP67-Rated Fixtures
DIY kits typically offer IP44-rated fixtures (splash-resistant only). Professional-grade IP67 fixtures withstand temporary submersion up to 1 meter—critical for poorly draining yards common in our area. This higher rating means your lights keep working even when water pools during heavy storms.
💡 Real-World Example
A Vancouver homeowner installed IP54-rated well-lights in a yard with poor drainage. After a January storm, standing water shorted the entire system. Sarkinen Electrical upgraded to IP67-rated fixtures with proper waterproofing. Three winters later, despite continued drainage issues, the system has experienced zero failures.
Cost Perspective
Professional weatherproofing prevents the accumulated costs of:
- Repeated service calls ($150-300 each)
- Blown transformers ($200-500 to replace)
- Safety hazards (GFCI-protected circuits are mandated by the National Electrical Code for good reason)
- Frustration and lost time troubleshooting recurring problems
- Potential fire hazards from compromised electrical connections
When you factor in these avoided costs, professional installation typically pays for itself within 2-3 years compared to the DIY approach.
Keeping Your Lights Bright All Season (Maintenance Checklist)
Even professional-grade systems benefit from regular maintenance. Follow this seasonal checklist to extend your system’s lifespan:
Fall Prep (Before the Rains Hit)
- Inspect all connections: Even professional systems should be checked annually
- Clear debris: Remove leaves and dirt from fixture lenses and transformer vents
- Check fixture seals: Look for cracks in gaskets; apply silicone sealant if needed
- Test GFCI outlets: Press the “TEST” button monthly to ensure proper function
- Trim vegetation: Cut back plants that have grown around fixtures during summer
Winter Monitoring
- After heavy storms, do a quick visual check that all lights are functioning
- If a zone goes dark, troubleshoot promptly before water damage spreads
- Clear snow away from transformers and ground-level fixtures
- Watch for ice buildup that might damage fixture housings
Spring Recovery
- Inspect for frost heave damage (wires pushed to the surface)
- Check for landscape maintenance damage from edgers and other tools
- Test all zones after the last freeze
- Replace any fixtures showing significant wear
- Clean fixture lenses for optimal light output
Summer Prevention
- Trim vegetation away from fixtures to prevent moisture trapping
- Consider applying UV-protective sealant to fixture gaskets
- Check that sprinkler systems aren’t directly hitting transformers or connections
- Inspect for insect nests in transformer housings
Professional Inspection Schedule
Every 2-3 years, have Sarkinen Electrical perform a comprehensive system check, especially if you have an older (5+ year) installation. We’ll identify potential problems before they cause failures and upgrade components as needed.
Final Thoughts
Pacific Northwest weather presents unique challenges for outdoor lighting systems due to relentless moisture exposure. While homeowners can safely troubleshoot basic issues—such as resetting GFCIs and visually inspecting for exposed wires—long-term reliability requires professional-grade weatherproofing materials and methods. You now know why your lights keep tripping after rain and how to diagnose the issue safely. But you also understand that permanent solutions require the right materials: silicone-sealed connections, direct-burial cable, and IP67-rated fixtures designed for our climate. Great landscape lighting shouldn’t be a fair-weather friend. With the right approach, your outdoor spaces can stay beautifully illuminated year-round—rain or shine.
Ready to End the Post-Storm Reset Cycle?
If your outdoor lighting has been battling the rain (and losing), Sarkinen Electrical can upgrade your system to weatherproof standards that last.
References:
- National Weather Service. (2024). Portland Climate Data and Averages. https://www.weather.gov/pqr/portlandclimate
- Electrical Safety Foundation International (ESFI). (2023). Outdoor Electrical Safety & Weather Hazards. https://www.esfi.org/outdoor-electrical-safety/
- National Fire Protection Association (NFPA). (2023). NFPA 70: National Electrical Code (NEC). https://www.nfpa.org/codes-and-standards/all-codes-and-standards/list-of-codes-and-standards/detail?code=70
- U.S. Department of Energy (DOE). (2023). Outdoor Lighting Quality, Reliability, and Resilience. https://www.energy.gov/eere/ssl/outdoor-lighting
- International Electrotechnical Commission (IEC). (2024). Understanding IP Ratings. https://www.iec.ch/ip-ratings